Hope you all have a wonderful and blessed Easter this weekend!

Here's a little something for those last minute Easter goodies and treats that you may have, FREE Printable Easter Tags, that have multiple uses; explore your creativity with them and enjoy!
{Compliments of Kroma Design Studio}

The Free printable PDF tag file, includes all 4 designs as shown below
(two file options - each file below has a different font):


or


The tags may be cut using any 2" Inch punch cutters; various designs and punches are shown on the top right of this page and may be ordered via my amazon links for future reference or at any local craft store (such as Michael's or Joann's).

Sample below shows tags cut with a scallop circle or scallop square design punch:
Enjoy and feel free to submit or share photos of how you used your Easter tags 
via our Facebook page:
{Don't forget to "Like" us on Facebook - Thanks!}  :)
Thursday, April 21, 2011 Valita Gal

Hope you all have a wonderful and blessed Easter this weekend!

Here's a little something for those last minute Easter goodies and treats that you may have, FREE Printable Easter Tags, that have multiple uses; explore your creativity with them and enjoy!
{Compliments of Kroma Design Studio}

The Free printable PDF tag file, includes all 4 designs as shown below
(two file options - each file below has a different font):


or


The tags may be cut using any 2" Inch punch cutters; various designs and punches are shown on the top right of this page and may be ordered via my amazon links for future reference or at any local craft store (such as Michael's or Joann's).

Sample below shows tags cut with a scallop circle or scallop square design punch:
Enjoy and feel free to submit or share photos of how you used your Easter tags 
via our Facebook page:
{Don't forget to "Like" us on Facebook - Thanks!}  :)
First Communion is right around the corner!  Check out some of Kroma Design's latest First Communion DIY party accessories that will be featured on our Etsy shop soon.  The First Communion Collection is presented in a gold and white color scheme, which may be personalized and customized with your own theme (an example below shows a First Communion Precious Moments Theme). 


Favor Tags


Double Layered Cupcake Toppers


First Communion Bookmarks

...more goodies for First Communions soon to come!

These current designs are available as personalized printable PDF files via Kroma Design's Etsy shop.
If you do not see the listing and are interested in the First Communion Accessories, 
contact Val via e-mail at val@kromadesign.com 
Thursday, April 14, 2011 Valita Gal
First Communion is right around the corner!  Check out some of Kroma Design's latest First Communion DIY party accessories that will be featured on our Etsy shop soon.  The First Communion Collection is presented in a gold and white color scheme, which may be personalized and customized with your own theme (an example below shows a First Communion Precious Moments Theme). 


Favor Tags


Double Layered Cupcake Toppers


First Communion Bookmarks

...more goodies for First Communions soon to come!

These current designs are available as personalized printable PDF files via Kroma Design's Etsy shop.
If you do not see the listing and are interested in the First Communion Accessories, 
contact Val via e-mail at val@kromadesign.com 

One of our recent customers were sweet to share photo's of their daughter, Jolie's first birthday theme.  The theme was called, "Look Whoo's Turning 1," and consisted of an adorable girly owl in a pink, green, and brown trendy color scheme.


{Baby jar labels designed by Kroma Design Studio}
Last but not least, for the favors, Jolie's mom asked us to design matching baby jar labels to match her pretty theme for her dessert table 
and filled the jars with delicious green, pink, brown, and white chocolate.  

A special thanks to Jolie's mommy for sharing the adorable details of Jolie's first birthday!

 
{Baby jar labels designed by Kroma Design Studio - click image for close up}

If you're interested in the "Look Whoo's Turning 1!" personalized owl themed baby jar labels, you may contact me via e-mail at val@kromadesign.com 
or click here to visit my shop 
to purchase your own personalized and customized themed baby jar labels.

Wednesday, March 23, 2011 Valita Gal

One of our recent customers were sweet to share photo's of their daughter, Jolie's first birthday theme.  The theme was called, "Look Whoo's Turning 1," and consisted of an adorable girly owl in a pink, green, and brown trendy color scheme.


{Baby jar labels designed by Kroma Design Studio}
Last but not least, for the favors, Jolie's mom asked us to design matching baby jar labels to match her pretty theme for her dessert table 
and filled the jars with delicious green, pink, brown, and white chocolate.  

A special thanks to Jolie's mommy for sharing the adorable details of Jolie's first birthday!

 
{Baby jar labels designed by Kroma Design Studio - click image for close up}

If you're interested in the "Look Whoo's Turning 1!" personalized owl themed baby jar labels, you may contact me via e-mail at val@kromadesign.com 
or click here to visit my shop 
to purchase your own personalized and customized themed baby jar labels.

 Have you picked up this month's magazine issue of 
PaperCraft Inspirations (Issue 84, March 2011)?!


If so, make sure to check out page 57, where Kroma Design Studio's 
Pink & Brown Cupcake Theme Cupcake Toppers have been featured!


A special thank you to card designer, Louise Fortune and the PaperCraft Inspiration team
for choosing to feature one of my complimentary designs in their article of 
"Quick & Easy Cards - 16 fun designs for you to make in minutes!"

This article is so eye candy and presents in such a pretty manner plenty of 
Do-It-Yourself card ideas for 
cupcake themed birthday parties, Mother's Day, Thank You cards, 
and much more!


or

This issue is a must have with all the cute templates, patterns, and online resources it has to creative DIY ideas, especially for party stationary!  Plus, I loved my FREE little gift!  The best part is that no matter which issue you choose to purchase, you receive a FREE crafting tool as a gift.  Now what more can you ask for to get you started?!


Whether it's for crafting card ideas or even to order your very own subscription,


Saturday, March 19, 2011 Valita Gal
 Have you picked up this month's magazine issue of 
PaperCraft Inspirations (Issue 84, March 2011)?!


If so, make sure to check out page 57, where Kroma Design Studio's 
Pink & Brown Cupcake Theme Cupcake Toppers have been featured!


A special thank you to card designer, Louise Fortune and the PaperCraft Inspiration team
for choosing to feature one of my complimentary designs in their article of 
"Quick & Easy Cards - 16 fun designs for you to make in minutes!"

This article is so eye candy and presents in such a pretty manner plenty of 
Do-It-Yourself card ideas for 
cupcake themed birthday parties, Mother's Day, Thank You cards, 
and much more!


or

This issue is a must have with all the cute templates, patterns, and online resources it has to creative DIY ideas, especially for party stationary!  Plus, I loved my FREE little gift!  The best part is that no matter which issue you choose to purchase, you receive a FREE crafting tool as a gift.  Now what more can you ask for to get you started?!


Whether it's for crafting card ideas or even to order your very own subscription,


Happy St. Patty's Day, readers! 
I came across a fun and quick green pudding dessert that can be used today to celebrate St. Patrick's Day or even a green themed baby shower or birthday party!  This delicious dessert doesn't take more than 30 minutes to prepare and to go with the St. Patty's day theme today, I have also included a FREE DIY printable dessert accessory (preview image & download link below) that can be added onto napkin rings, straws, be made into dessert toppers, or even can be used as tags for cookies.

Green Pudding Recipe

Ingredients:
• 2 boxes (4 serving size each) of JELLO vanilla flavor instant pudding
{or use JELLO pistachio flavor instant pudding & eliminate the green food coloring}
• 3 1/2 cups cold milk
• 1 teaspoon green food coloring
• 1 tub Cool Whip (8 oz.)
• 1-18oz pkg. Oreos, coarsely crushed
• Shamrock candies, cookies, etc. for garnish


Directions:
Pour milk into large bowl. Stir in food coloring. Add pudding mixes and beat with a wire whisk 2 minutes or till well blended. Let stand 5 minutes. Gently stir in Cool Whip. In a trifle bowl layer crushed cookies and pudding mixture. Garnish as desired. Refrigerate for atleast an hour or till ready to serve.  

Decorate your table with all types of green desserts and enjoy this lucky day!


FREE Printable Dessert Toppers and Tags 


Thursday, March 17, 2011 Valita Gal
Happy St. Patty's Day, readers! 
I came across a fun and quick green pudding dessert that can be used today to celebrate St. Patrick's Day or even a green themed baby shower or birthday party!  This delicious dessert doesn't take more than 30 minutes to prepare and to go with the St. Patty's day theme today, I have also included a FREE DIY printable dessert accessory (preview image & download link below) that can be added onto napkin rings, straws, be made into dessert toppers, or even can be used as tags for cookies.

Green Pudding Recipe

Ingredients:
• 2 boxes (4 serving size each) of JELLO vanilla flavor instant pudding
{or use JELLO pistachio flavor instant pudding & eliminate the green food coloring}
• 3 1/2 cups cold milk
• 1 teaspoon green food coloring
• 1 tub Cool Whip (8 oz.)
• 1-18oz pkg. Oreos, coarsely crushed
• Shamrock candies, cookies, etc. for garnish


Directions:
Pour milk into large bowl. Stir in food coloring. Add pudding mixes and beat with a wire whisk 2 minutes or till well blended. Let stand 5 minutes. Gently stir in Cool Whip. In a trifle bowl layer crushed cookies and pudding mixture. Garnish as desired. Refrigerate for atleast an hour or till ready to serve.  

Decorate your table with all types of green desserts and enjoy this lucky day!


FREE Printable Dessert Toppers and Tags 


We have been away for quite awhile, but will slowly be coming back this year with new DIY inspirational ideas and a renovated online Etsy shop that will soon focus more on personalized custom designed tags and labels for your special events!

Furthermore, you may seen me from time to time sharing fresh and fun baby shower ideas, since I am expecting a new little bundle of joy to join my family by July ~ 2011!  I'm so thrilled and excited, but for today I would like to share an adorable sweet recipe idea: Phyllo Edible Dessert Nests, which I found on the Martha Stewart's site.


This recipe is not only perfect for Easter on the way, but wonderful to use for "Nesting" themed baby showers this Spring!

Ingredients:
Serving Makes 12
  • 3 tablespoons unsalted butter, melted, plus more for tin
  • 8 ounces (1/2 package) kataifi, thawed
  • 4 teaspoons sugar
  • 1 teaspoon ground cinnamon, (optional)
  • Jelly beans, for serving
Directions:
  1. Preheat oven to 375 degrees. Brush a 12-cup muffin tin with butter. Pull phyllo into 1-inch-thick bundles; cut bundles into 2-inch lengths. Place in a bowl; separate into a loose pile with fingers. Toss with butter, sugar, and cinnamon, if using.
  2. Divide among 12 muffin cups; press into bottom and up sides. Cook until golden and crisp around the edges, 15 to 20 minutes. Let cool; fill with jelly beans  

Source: Martha Stewart Living, April 2003
Saturday, February 26, 2011 Valita Gal

We have been away for quite awhile, but will slowly be coming back this year with new DIY inspirational ideas and a renovated online Etsy shop that will soon focus more on personalized custom designed tags and labels for your special events!

Furthermore, you may seen me from time to time sharing fresh and fun baby shower ideas, since I am expecting a new little bundle of joy to join my family by July ~ 2011!  I'm so thrilled and excited, but for today I would like to share an adorable sweet recipe idea: Phyllo Edible Dessert Nests, which I found on the Martha Stewart's site.


This recipe is not only perfect for Easter on the way, but wonderful to use for "Nesting" themed baby showers this Spring!

Ingredients:
Serving Makes 12
  • 3 tablespoons unsalted butter, melted, plus more for tin
  • 8 ounces (1/2 package) kataifi, thawed
  • 4 teaspoons sugar
  • 1 teaspoon ground cinnamon, (optional)
  • Jelly beans, for serving
Directions:
  1. Preheat oven to 375 degrees. Brush a 12-cup muffin tin with butter. Pull phyllo into 1-inch-thick bundles; cut bundles into 2-inch lengths. Place in a bowl; separate into a loose pile with fingers. Toss with butter, sugar, and cinnamon, if using.
  2. Divide among 12 muffin cups; press into bottom and up sides. Cook until golden and crisp around the edges, 15 to 20 minutes. Let cool; fill with jelly beans  

Source: Martha Stewart Living, April 2003

We've been away, due to many updates and changes coming your way.  Our analytics and emails, show readers following up on our blog everyday, hoping for updates.  

However, we want to thank those devoted fans and let you all know that the first Monday in 2011, we will be back with many Kroma Design Studio surprises!  
Stay tuned and let's countdown the New Year...


Wednesday, December 29, 2010 Valita Gal

We've been away, due to many updates and changes coming your way.  Our analytics and emails, show readers following up on our blog everyday, hoping for updates.  

However, we want to thank those devoted fans and let you all know that the first Monday in 2011, we will be back with many Kroma Design Studio surprises!  
Stay tuned and let's countdown the New Year...


Today I wanted to feature the wonderful Le Papier Studio
that focuses on illustrating unique sophisticated custom silhouette design.  

I'm so thrilled that they recently just launched their first book called, Silhouette Art.  

This book is so cute and informative, featuring  instructions, papers and patterns for making modern heirlooms.
Meet the arthur - Vana Chupp:
 Professionally trained as an architect, Vana Chupp has always been artistically inspired by the sweet and simple moments in life.  Her craft was born with the birth of her beautiful boy Nikolas. Documenting her son's milestones by cleverly capturing his personality, emotion, playfulness and essence, she began using silhouettes to tell her own life story.  It's a love story - continuing to blossom, with Nikolas as her muse. Coming full circle, Vana was able to combine her passion and artistic expressions and share it all with you!
In 2008 Vana launched her dream job; Le Papier Studio, a small woman-owned business that expresses creativity and inspiration, all the while giving her time to fulfill her most important job; being a mom.  Le Papier Studio specializes in illustrating unique custom silhouettes. Vana's charming and intimate custom silhouettes will capture your heart and symbolize your treasured memories for years to come. 
~*~


If you like this elegant style of design as we do, 
follow Vana's Blog!


Tuesday, October 05, 2010 Valita Gal
Today I wanted to feature the wonderful Le Papier Studio
that focuses on illustrating unique sophisticated custom silhouette design.  

I'm so thrilled that they recently just launched their first book called, Silhouette Art.  

This book is so cute and informative, featuring  instructions, papers and patterns for making modern heirlooms.
Meet the arthur - Vana Chupp:
 Professionally trained as an architect, Vana Chupp has always been artistically inspired by the sweet and simple moments in life.  Her craft was born with the birth of her beautiful boy Nikolas. Documenting her son's milestones by cleverly capturing his personality, emotion, playfulness and essence, she began using silhouettes to tell her own life story.  It's a love story - continuing to blossom, with Nikolas as her muse. Coming full circle, Vana was able to combine her passion and artistic expressions and share it all with you!
In 2008 Vana launched her dream job; Le Papier Studio, a small woman-owned business that expresses creativity and inspiration, all the while giving her time to fulfill her most important job; being a mom.  Le Papier Studio specializes in illustrating unique custom silhouettes. Vana's charming and intimate custom silhouettes will capture your heart and symbolize your treasured memories for years to come. 
~*~


If you like this elegant style of design as we do, 
follow Vana's Blog!


Birthday parties and Halloween are just around the corner!

Thinking about dressing up your child as a ballerina, fairy princess, tinkerbell, or butterfly?  
Then look no further and challenge yourself in designing your child's tutu with this easy DIY no sew video tutorial that worked for my daughter's *Little Ballerina* 4th Birthday Party!  


that I followed by Julie Figueroa:


However, my tutu's were a craft that each child got to creatively craft on their own at my daughter's ballerina party, along with matching hair clips.  They got to decorate their tutu's and hair clips by choosing from a variety of colorful ribbons, flowers, and rhinestones!


For more details on this Little Ballerina Party theme and DIY printable party accessories, 

If you encounter questions about how to make this "no sew" tutu, 
feel free to ask us on our facebook page.


~*~

Adorable accessories that you can add onto your little girl's tutu are featured below:


Purple Fairy Wings, crafted by Kroma Design Studio


Pretty in Pink Little Girl Bracelet, crafted by Gorgeous Georgia


Fairy Wand, crafted by Cara Magic
 

Hailey Floral Hair Clip, crafted by Vee & Elle

Monday, October 04, 2010 Valita Gal

Birthday parties and Halloween are just around the corner!

Thinking about dressing up your child as a ballerina, fairy princess, tinkerbell, or butterfly?  
Then look no further and challenge yourself in designing your child's tutu with this easy DIY no sew video tutorial that worked for my daughter's *Little Ballerina* 4th Birthday Party!  


that I followed by Julie Figueroa:


However, my tutu's were a craft that each child got to creatively craft on their own at my daughter's ballerina party, along with matching hair clips.  They got to decorate their tutu's and hair clips by choosing from a variety of colorful ribbons, flowers, and rhinestones!


For more details on this Little Ballerina Party theme and DIY printable party accessories, 

If you encounter questions about how to make this "no sew" tutu, 
feel free to ask us on our facebook page.


~*~

Adorable accessories that you can add onto your little girl's tutu are featured below:


Purple Fairy Wings, crafted by Kroma Design Studio


Pretty in Pink Little Girl Bracelet, crafted by Gorgeous Georgia


Fairy Wand, crafted by Cara Magic
 

Hailey Floral Hair Clip, crafted by Vee & Elle

{Photo from Bakers Royale}

Have you been wanting to try a new delicious frosting recipe for the Fall season?

Check out this pretty cappuccino color frosting made of Peanut Butter!

Simple and fun to make, just follow the recipe below and top it off with:

Reeses peanut butter cups...

{Photo from Veg SF}

 or even Reeses pieces...

{Photo from A Baked Creation}

{Photo from A Baked Creation}

Peanut Butter Frosting Recipe

Yield: Enough to frost 12 cupcakes
Prep Time: 10 minutes
Ingredients:
1 cup confectioners’ sugar
1 cup creamy peanut butter
5 tablespoons unsalted butter, at room temperature
¾ teaspoon vanilla extract
¼ teaspoon kosher salt
1/3 cup heavy cream
{Photo from A Beantown Baker}
Directions:
Place the confectioners’ sugar, peanut butter, butter, vanilla and salt in the bowl of an electric mixer fitted with a paddle attachment. Mix on medium-low speed until creamy, scraping down the bowl with a rubber spatula as you work. Add the cream and beat on high speed until the mixture is light and smooth.
Friday, October 01, 2010 Valita Gal
{Photo from Bakers Royale}

Have you been wanting to try a new delicious frosting recipe for the Fall season?

Check out this pretty cappuccino color frosting made of Peanut Butter!

Simple and fun to make, just follow the recipe below and top it off with:

Reeses peanut butter cups...

{Photo from Veg SF}

 or even Reeses pieces...

{Photo from A Baked Creation}

{Photo from A Baked Creation}

Peanut Butter Frosting Recipe

Yield: Enough to frost 12 cupcakes
Prep Time: 10 minutes
Ingredients:
1 cup confectioners’ sugar
1 cup creamy peanut butter
5 tablespoons unsalted butter, at room temperature
¾ teaspoon vanilla extract
¼ teaspoon kosher salt
1/3 cup heavy cream
{Photo from A Beantown Baker}
Directions:
Place the confectioners’ sugar, peanut butter, butter, vanilla and salt in the bowl of an electric mixer fitted with a paddle attachment. Mix on medium-low speed until creamy, scraping down the bowl with a rubber spatula as you work. Add the cream and beat on high speed until the mixture is light and smooth.
Have you ever encountered a moment in where you just couldn't find the perfect cake or cupcake stand?!  Well you don't have to look any further!  Why not try this easy and affordable DIY Cake Stand Tutorial for your next party or event, created by Jennie of A Well Crafted Party especially for Eat • Drink • Pretty's site.


How to make your own Cake or Cupcake Stand Tutorial
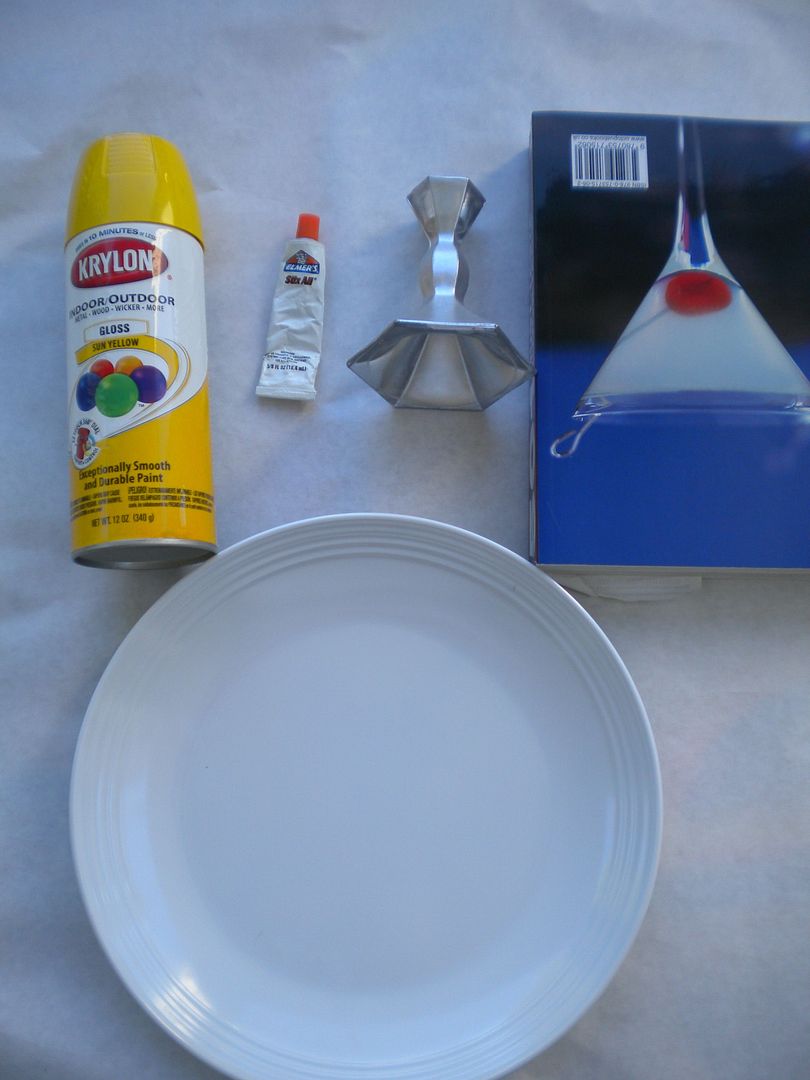
Needed Materials:
1 plate
1 candle stick or goblet
Epoxy
1 heavy book
1 can of spray paint (I really like the way gloss looks for this project)
a sheet or paper to protect surfaces while painting

Making a home-made cake stand is incredibly easy. First, start of with a plate—any plate will work but I recommend using one that has the color or image you would like at the top of the stand as this will not be painted to keep the cake stand food friendly. Next, find a candle stick, goblet or really any sturdy object that is the height that you would like for your finished stand. I have used both candle sticks and goblets in the past.
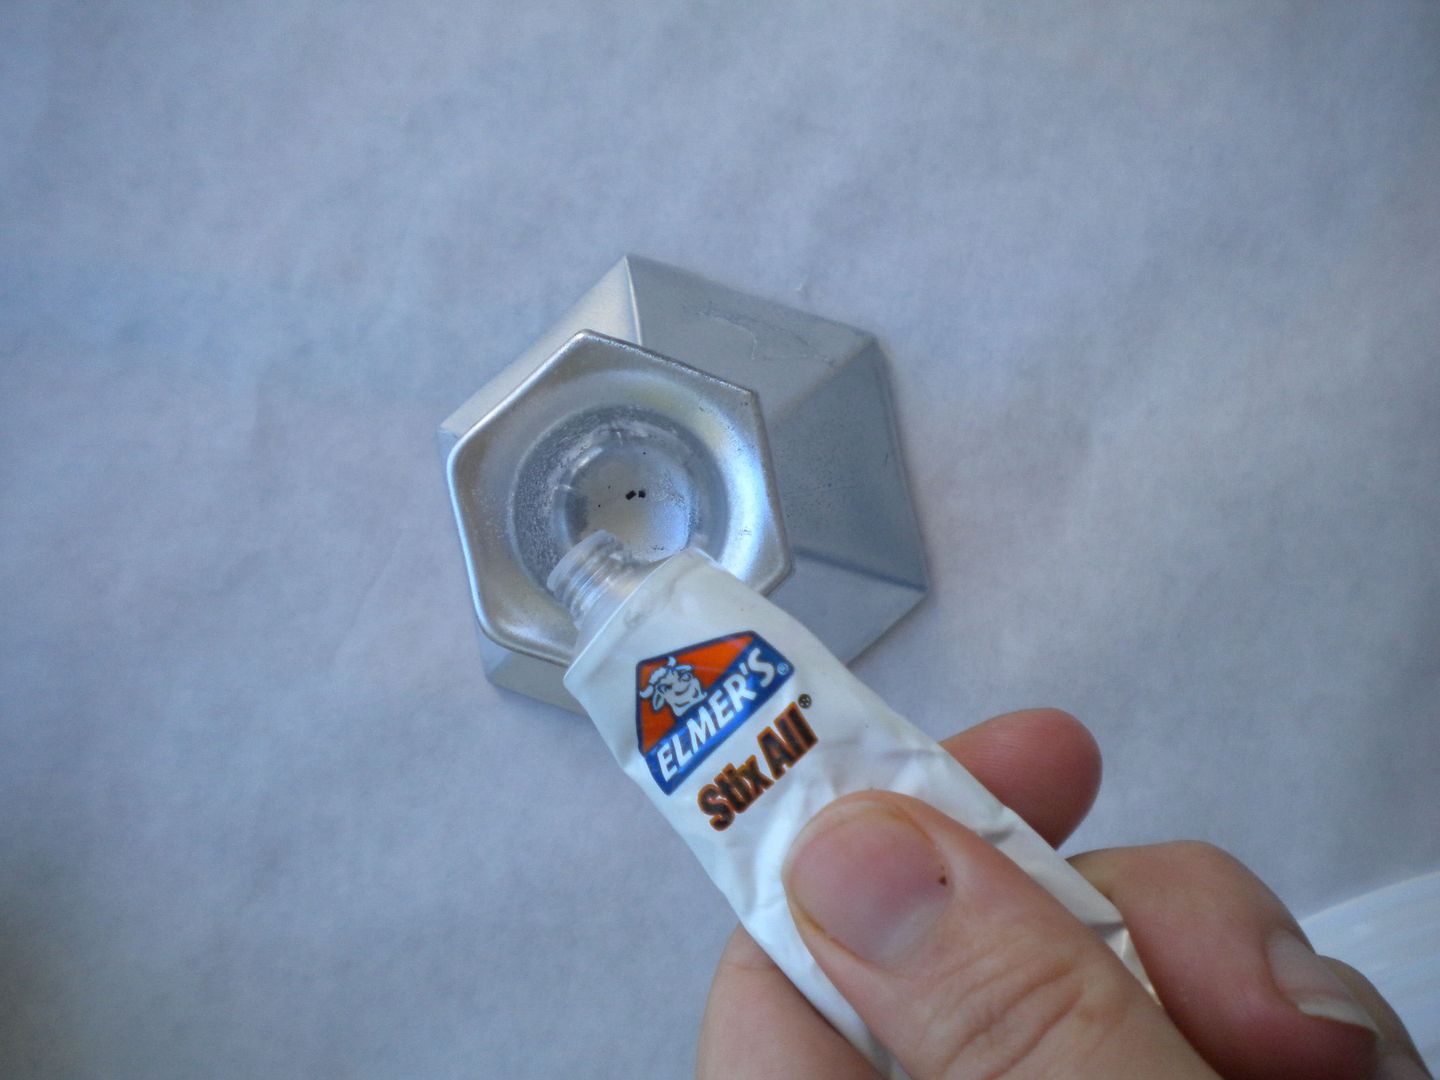
Then take epoxy (use according to directions) and glue your candlestick or goblet to the bottom of the plate. DO NOT MOVE THE STAND.
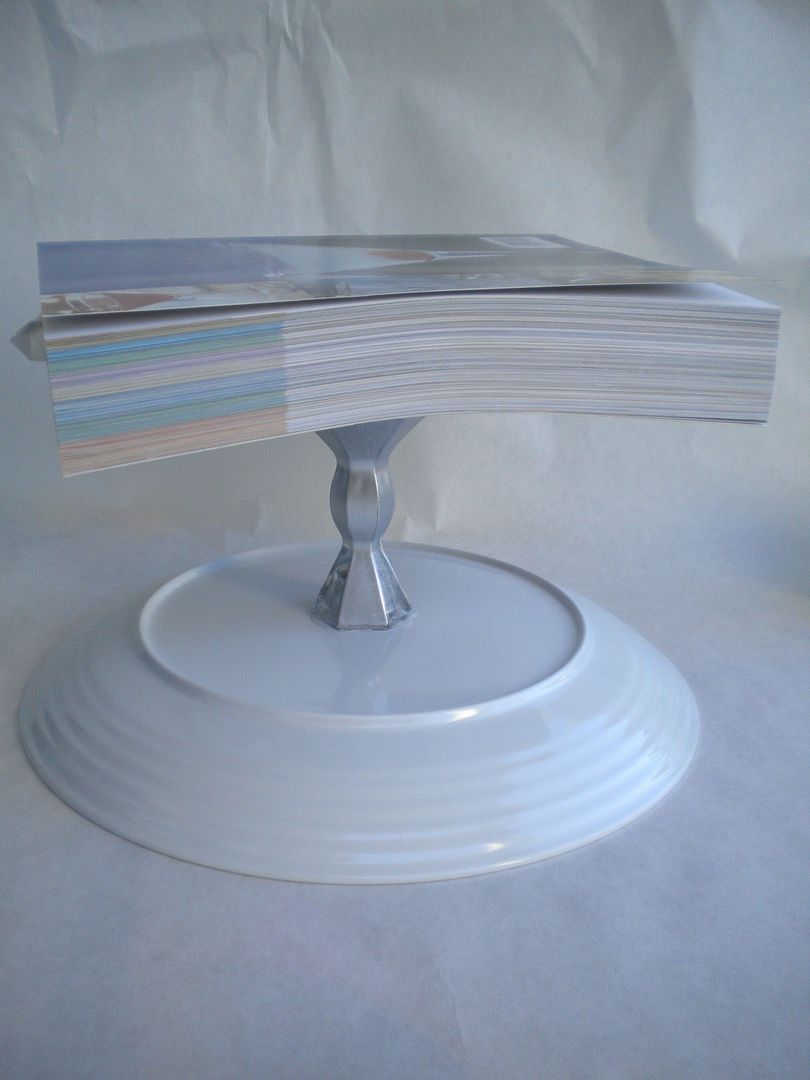
Place a heavy book on top of the stand and let the epoxy set according to directions. After the epoxy has set you should be able to pick up the stand with no movement from the candlestick or plate
Make sure the plate is set firmly on a protected surface so that you can spray paint the outside of the cake stand. If there are edges of the paint off of the paper I would suggest covering the top of the plate with paper or painters tape
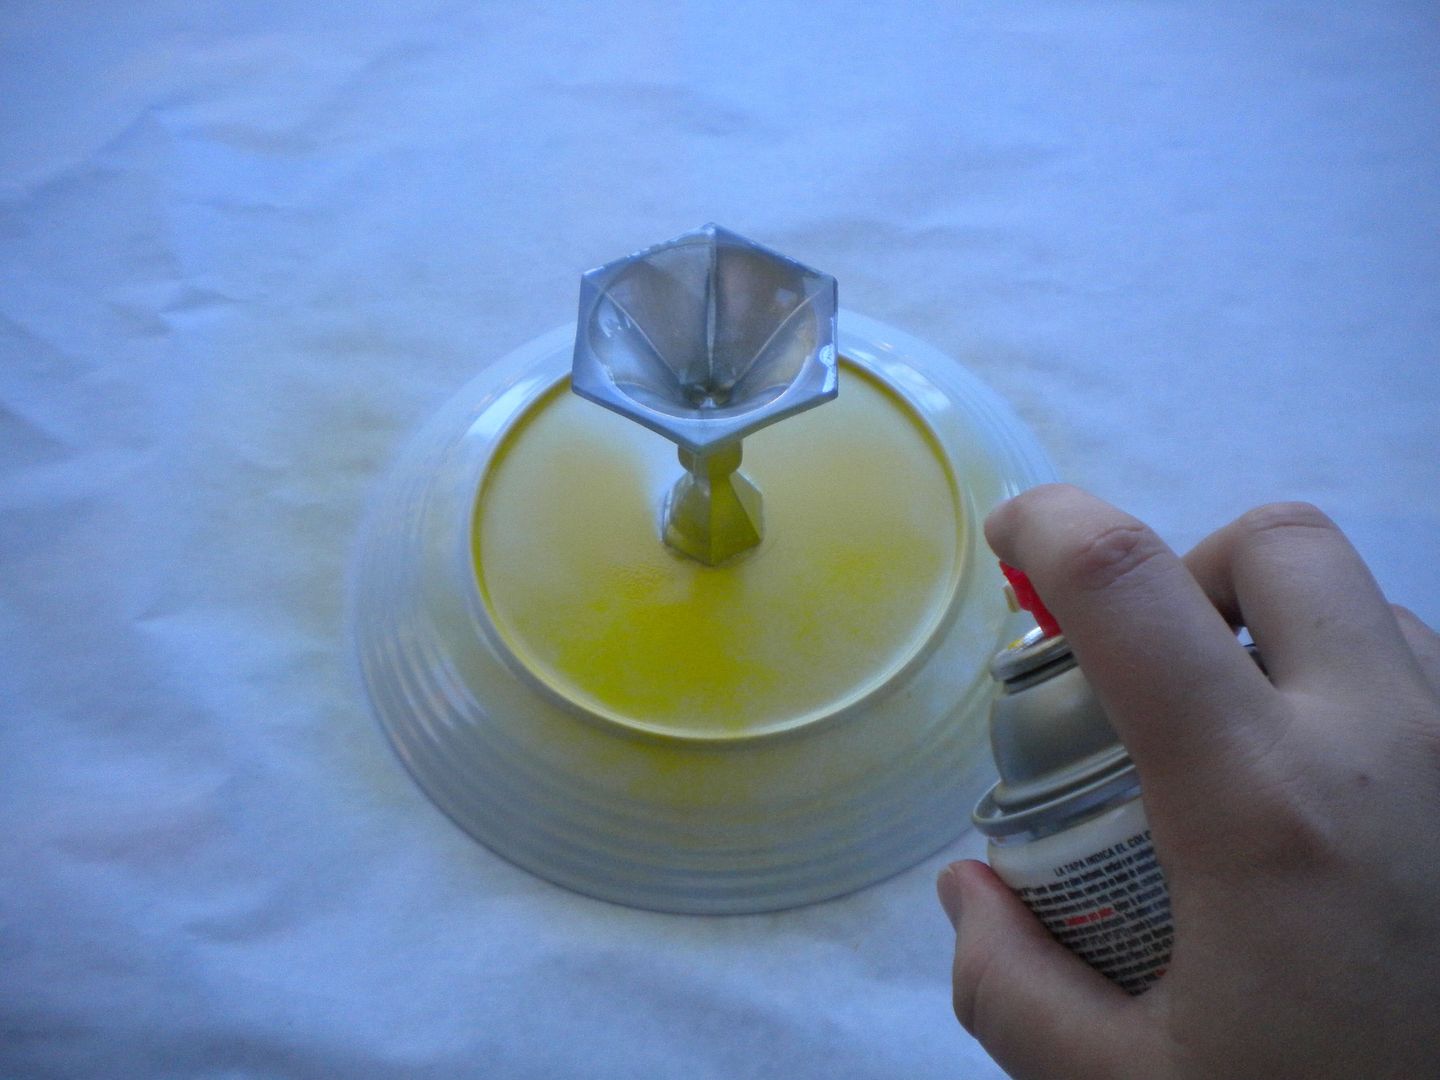
Spray the entire outer surface according to the directions on the spray paint can. Take your time on this step and stand back far enough to avoid drips. Also, this step make take a couple of layers of paint so plan to make the stands at least a day in advance of your party.
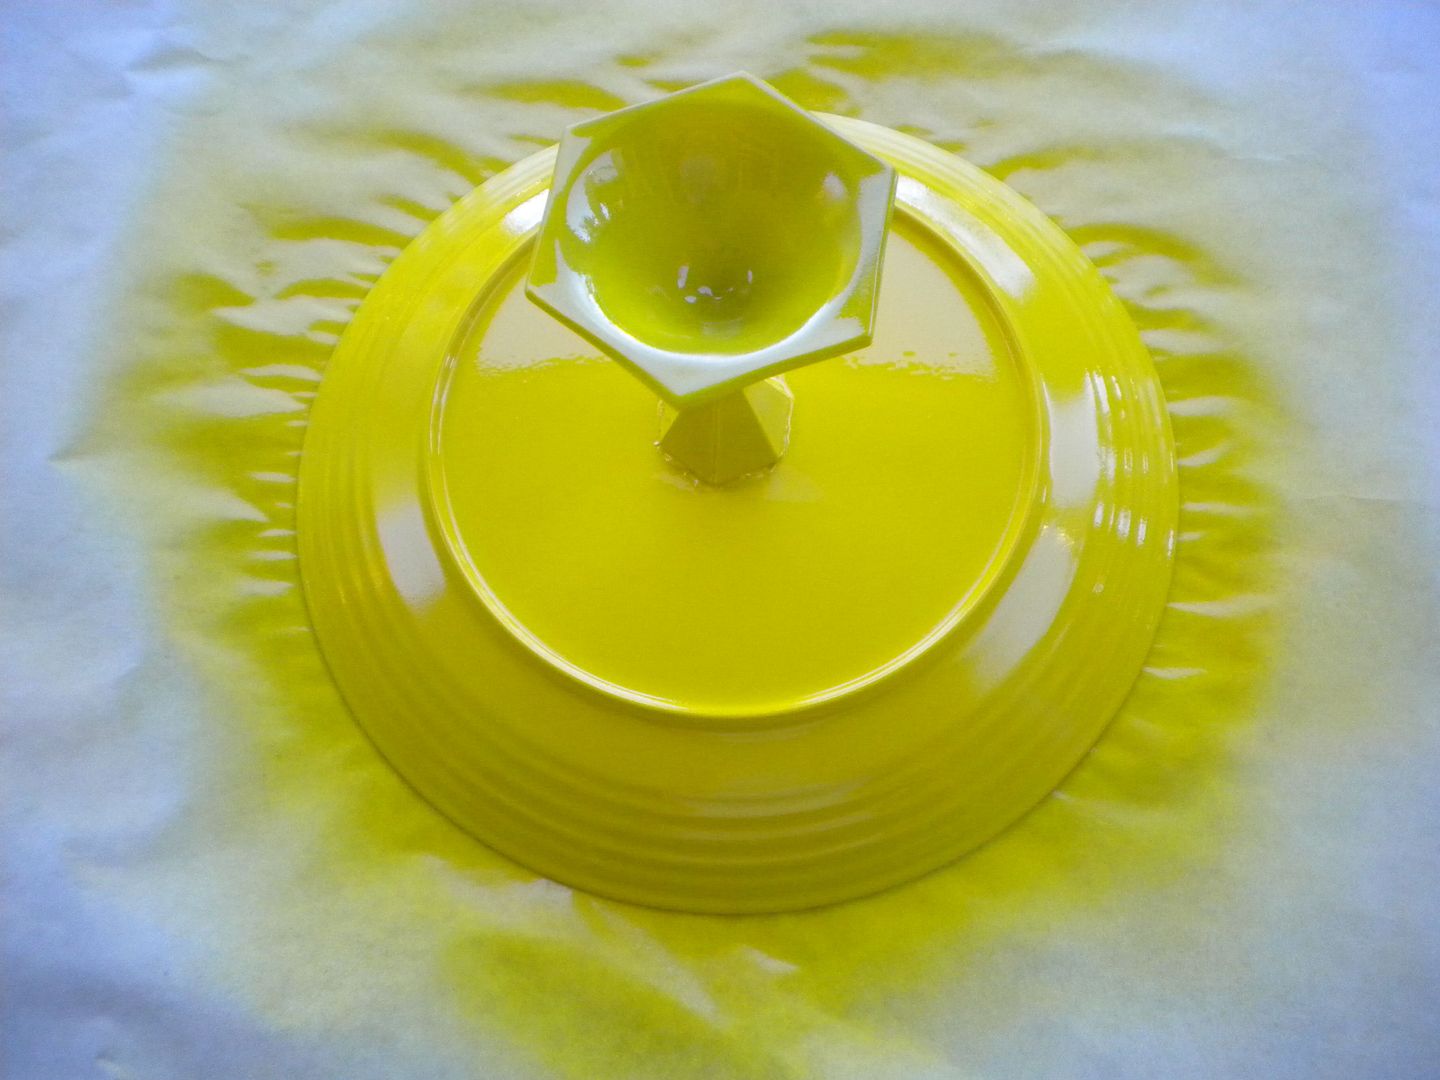
After the stand has dried, wash the top of the plate with dish soap and water. The stand is not dishwasher safe but is food friendly as long as food is not touching the painted surfaces. If you are worried about this then just place a doily or wax paper on top of the stand before putting food on it.
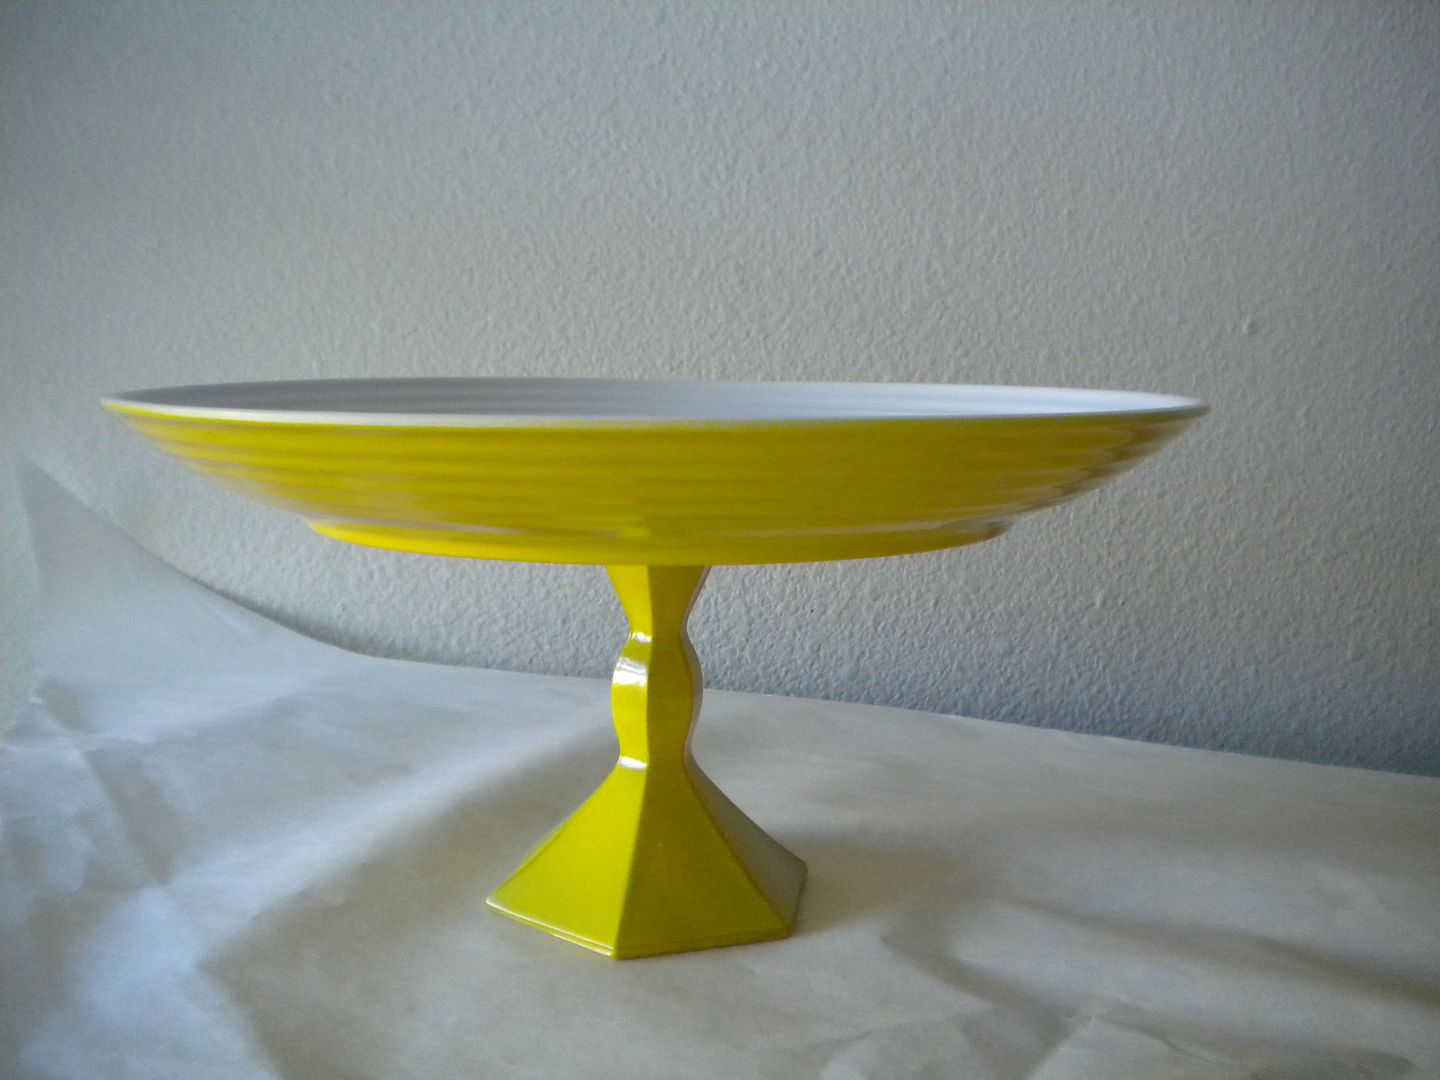

Tutorial by:  Jennie of A Well Crafted Party
Thursday, September 30, 2010 Valita Gal
Have you ever encountered a moment in where you just couldn't find the perfect cake or cupcake stand?!  Well you don't have to look any further!  Why not try this easy and affordable DIY Cake Stand Tutorial for your next party or event, created by Jennie of A Well Crafted Party especially for Eat • Drink • Pretty's site.


How to make your own Cake or Cupcake Stand Tutorial
Needed Materials:
1 plate
1 candle stick or goblet
Epoxy
1 heavy book
1 can of spray paint (I really like the way gloss looks for this project)
a sheet or paper to protect surfaces while painting

Making a home-made cake stand is incredibly easy. First, start of with a plate—any plate will work but I recommend using one that has the color or image you would like at the top of the stand as this will not be painted to keep the cake stand food friendly. Next, find a candle stick, goblet or really any sturdy object that is the height that you would like for your finished stand. I have used both candle sticks and goblets in the past.
Then take epoxy (use according to directions) and glue your candlestick or goblet to the bottom of the plate. DO NOT MOVE THE STAND.
Place a heavy book on top of the stand and let the epoxy set according to directions. After the epoxy has set you should be able to pick up the stand with no movement from the candlestick or plate
Make sure the plate is set firmly on a protected surface so that you can spray paint the outside of the cake stand. If there are edges of the paint off of the paper I would suggest covering the top of the plate with paper or painters tape
Spray the entire outer surface according to the directions on the spray paint can. Take your time on this step and stand back far enough to avoid drips. Also, this step make take a couple of layers of paint so plan to make the stands at least a day in advance of your party.
After the stand has dried, wash the top of the plate with dish soap and water. The stand is not dishwasher safe but is food friendly as long as food is not touching the painted surfaces. If you are worried about this then just place a doily or wax paper on top of the stand before putting food on it.


Tutorial by:  Jennie of A Well Crafted Party