


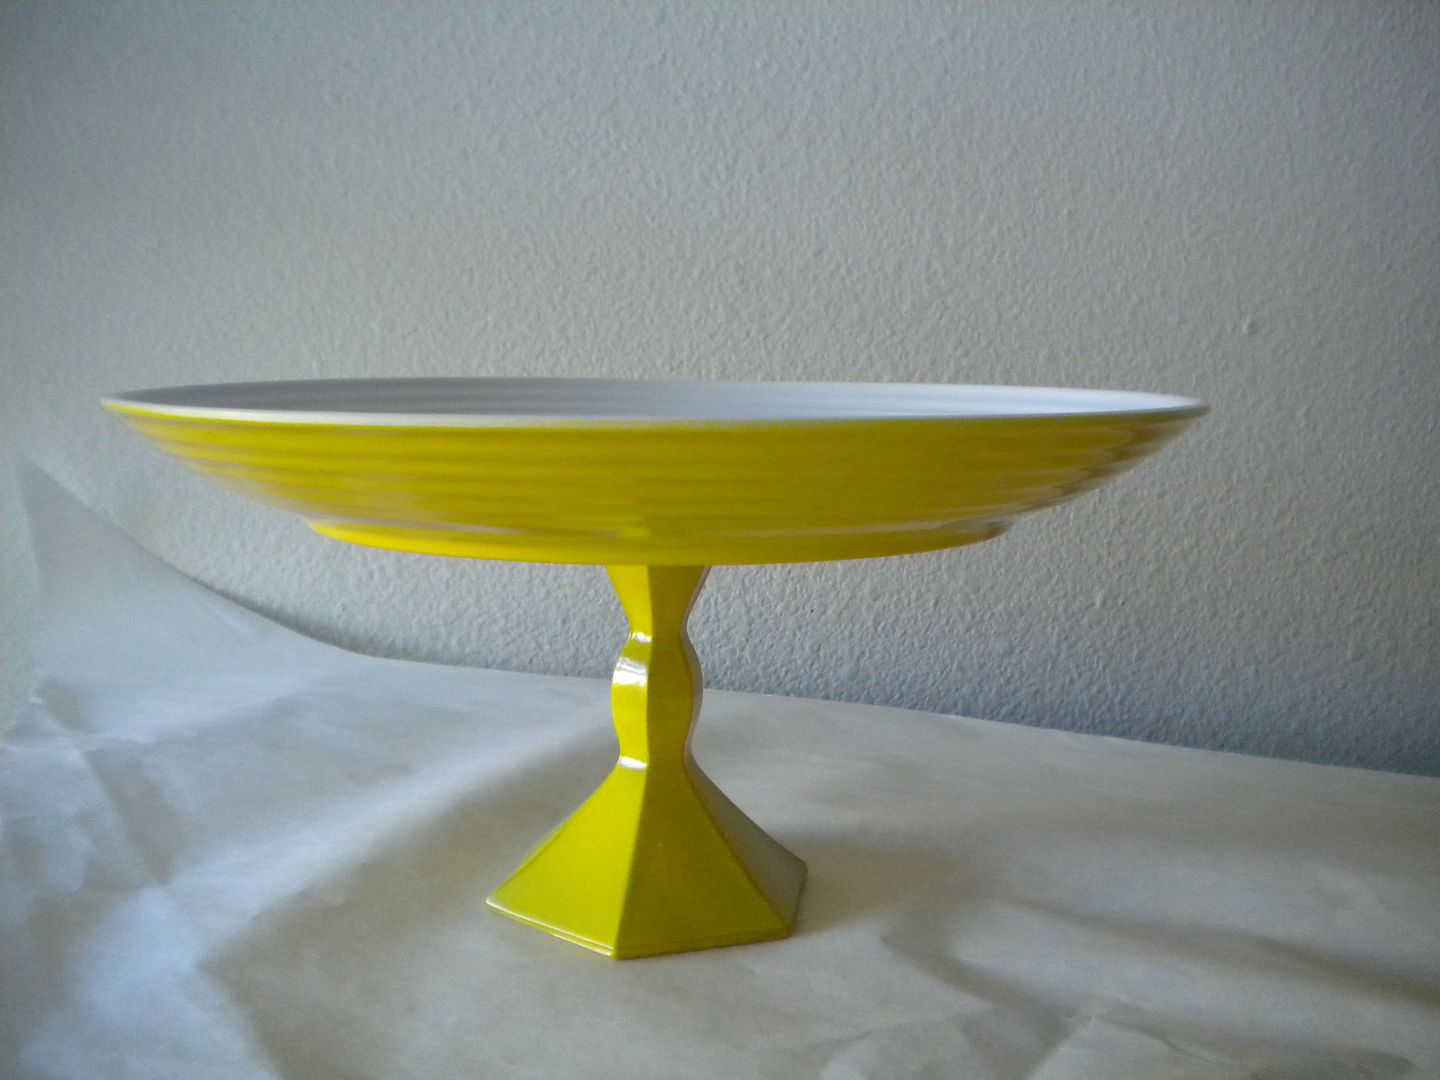
Have you ever encountered a moment in where you just couldn't find the perfect cake or cupcake stand?! Well you don't have to look any further! Why not try this easy and affordable DIY Cake Stand Tutorial for your next party or event, created by Jennie of A Well Crafted Party especially for Eat • Drink • Pretty's site.


How to make your own Cake or Cupcake Stand Tutorial
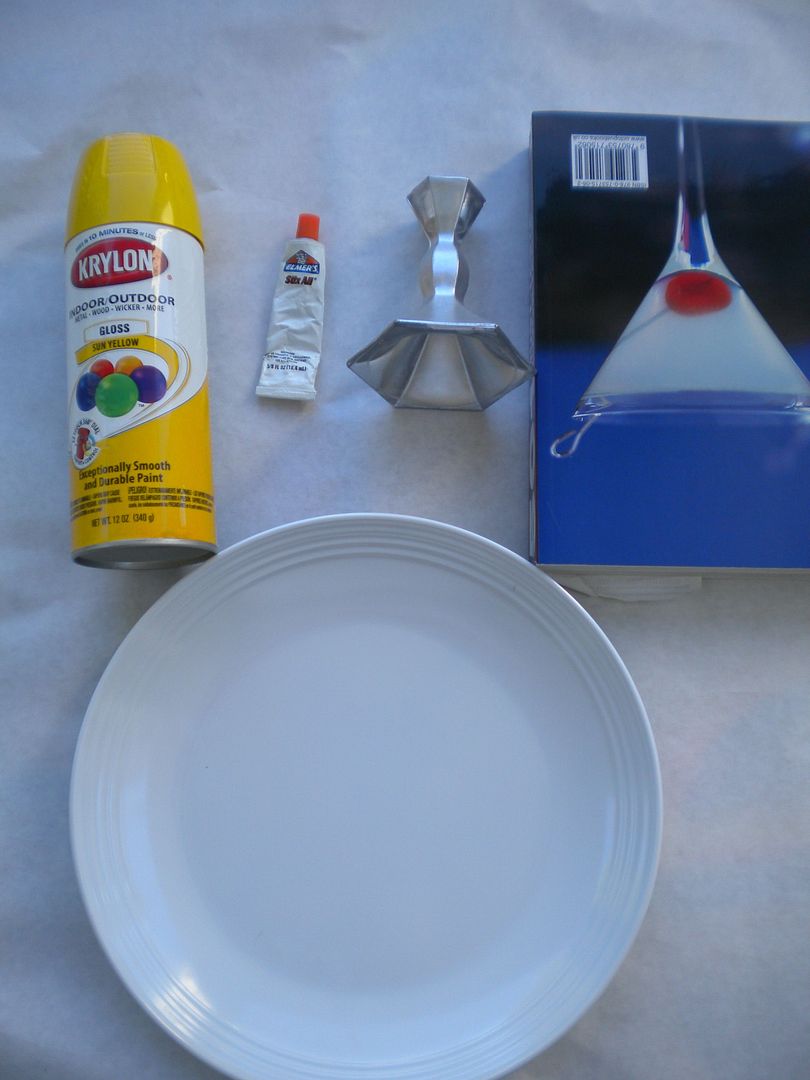
Needed Materials:
1 plate
1 candle stick or goblet
Epoxy
1 heavy book
1 can of spray paint (I really like the way gloss looks for this project)
a sheet or paper to protect surfaces while painting
Making a home-made cake stand is incredibly easy. First, start of with a plate—any plate will work but I recommend using one that has the color or image you would like at the top of the stand as this will not be painted to keep the cake stand food friendly. Next, find a candle stick, goblet or really any sturdy object that is the height that you would like for your finished stand. I have used both candle sticks and goblets in the past.
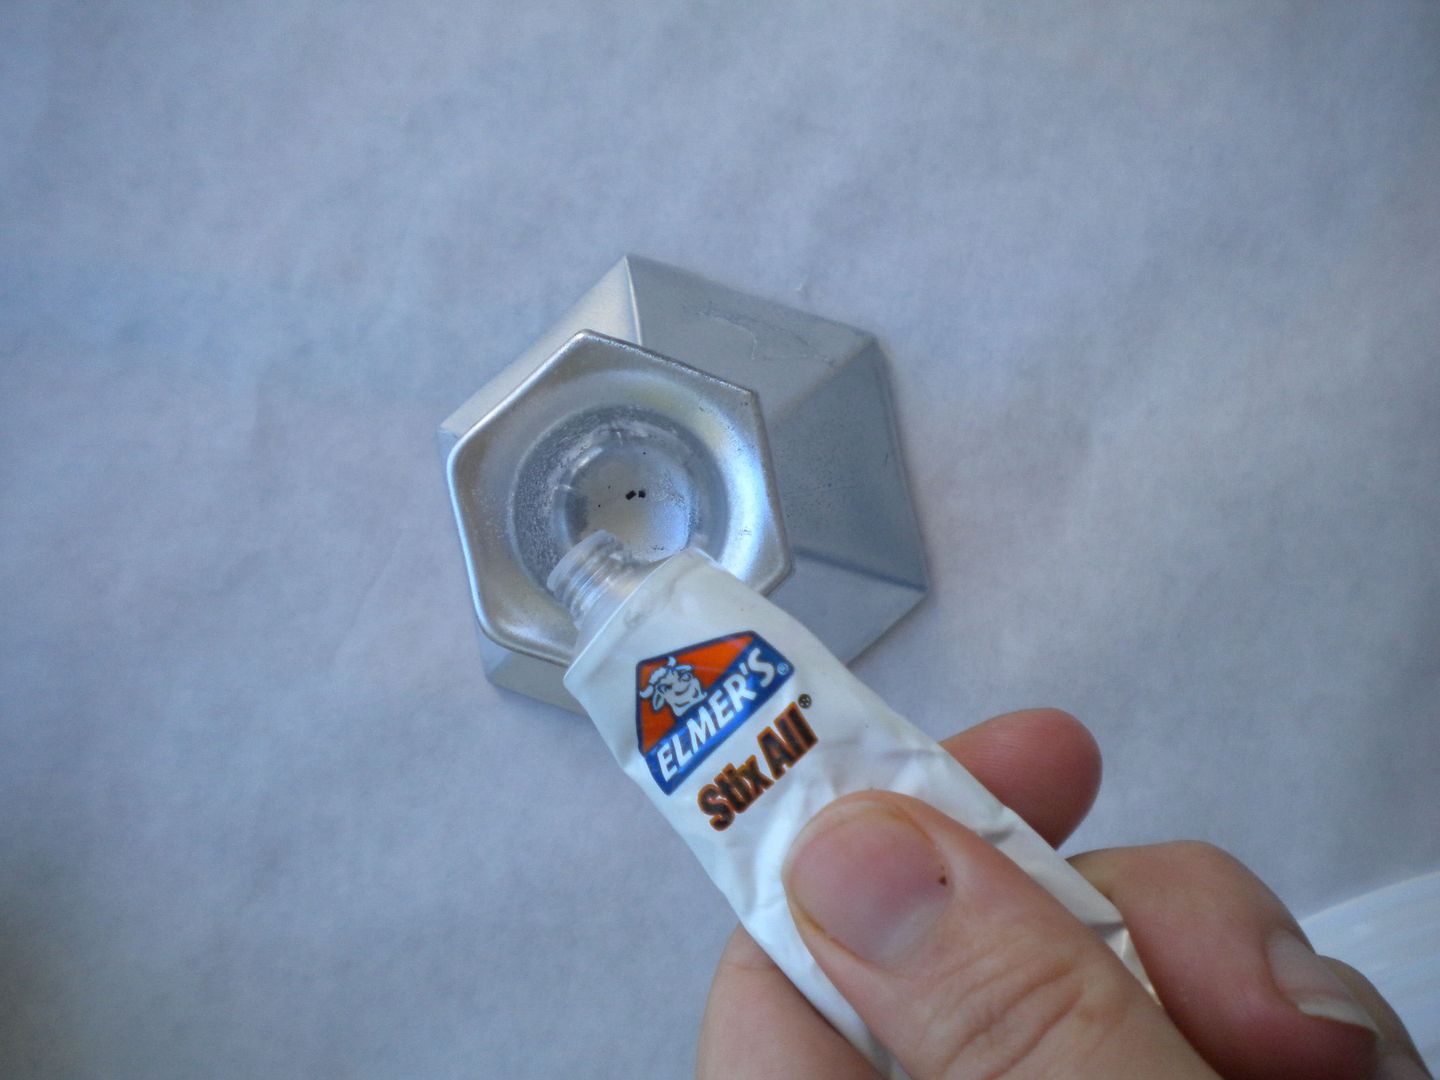
 Then take epoxy (use according to directions) and glue your candlestick or goblet to the bottom of the plate. DO NOT MOVE THE STAND.
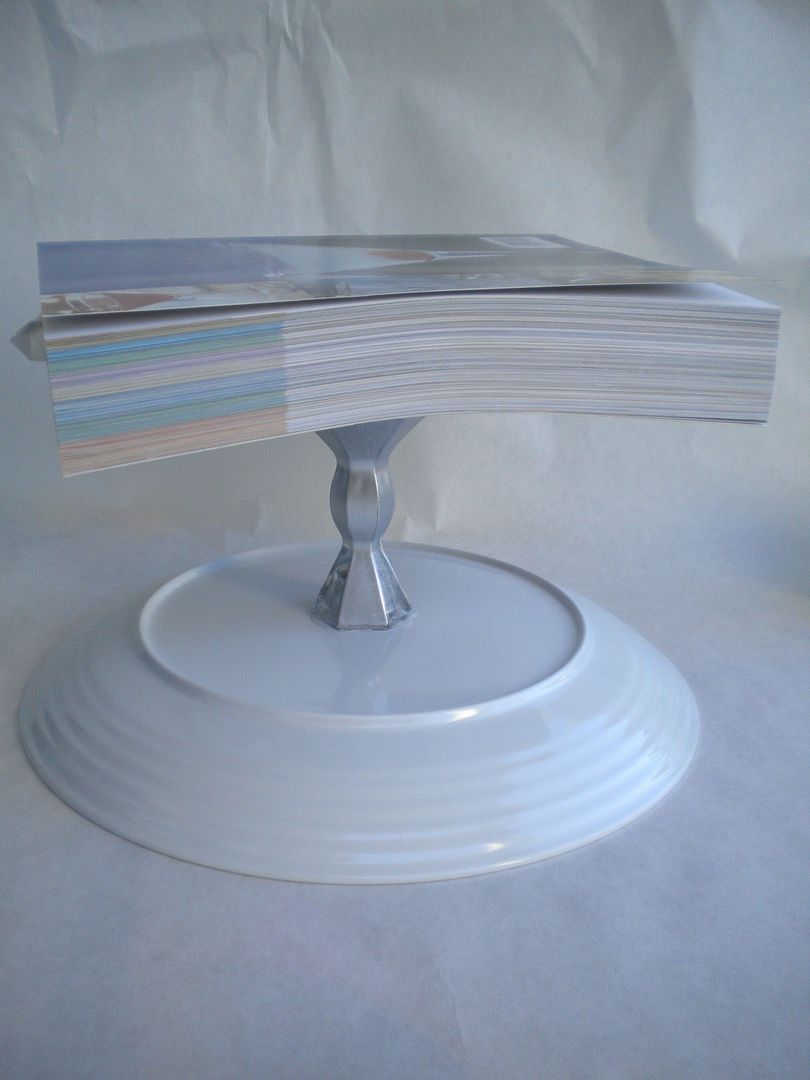
 Place a heavy book on top of the stand and let the epoxy set according to directions. After the epoxy has set you should be able to pick up the stand with no movement from the candlestick or plate
 Make sure the plate is set firmly on a protected surface so that you can spray paint the outside of the cake stand. If there are edges of the paint off of the paper I would suggest covering the top of the plate with paper or painters tape
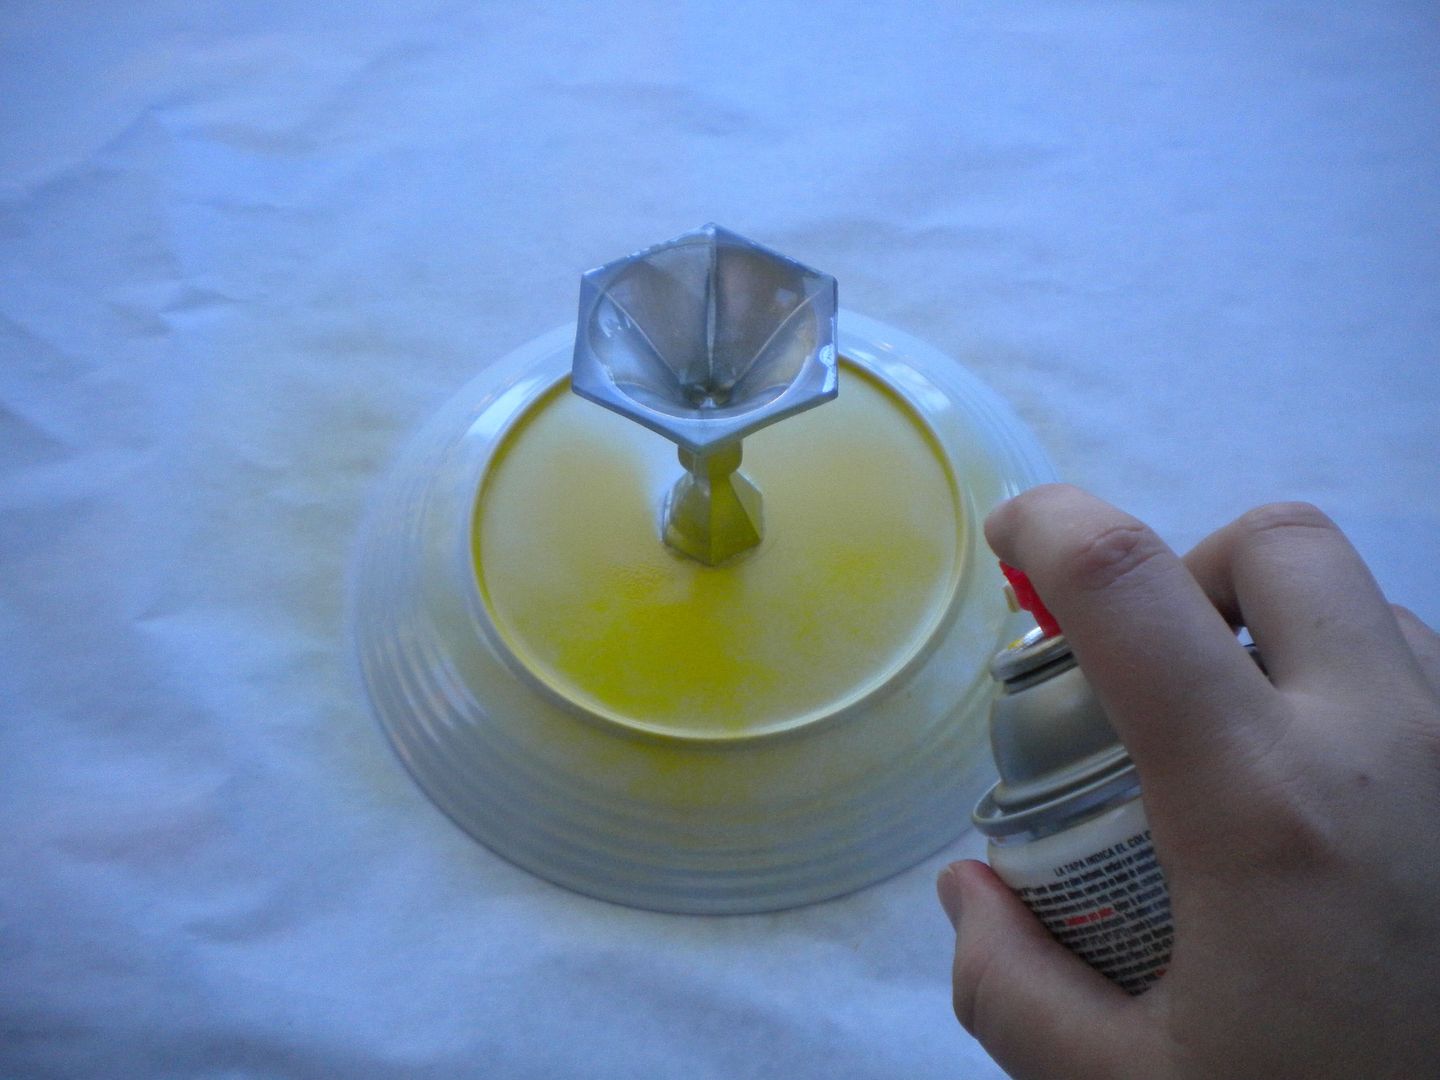 Spray the entire outer surface according to the directions on the spray paint can. Take your time on this step and stand back far enough to avoid drips. Also, this step make take a couple of layers of paint so plan to make the stands at least a day in advance of your party.
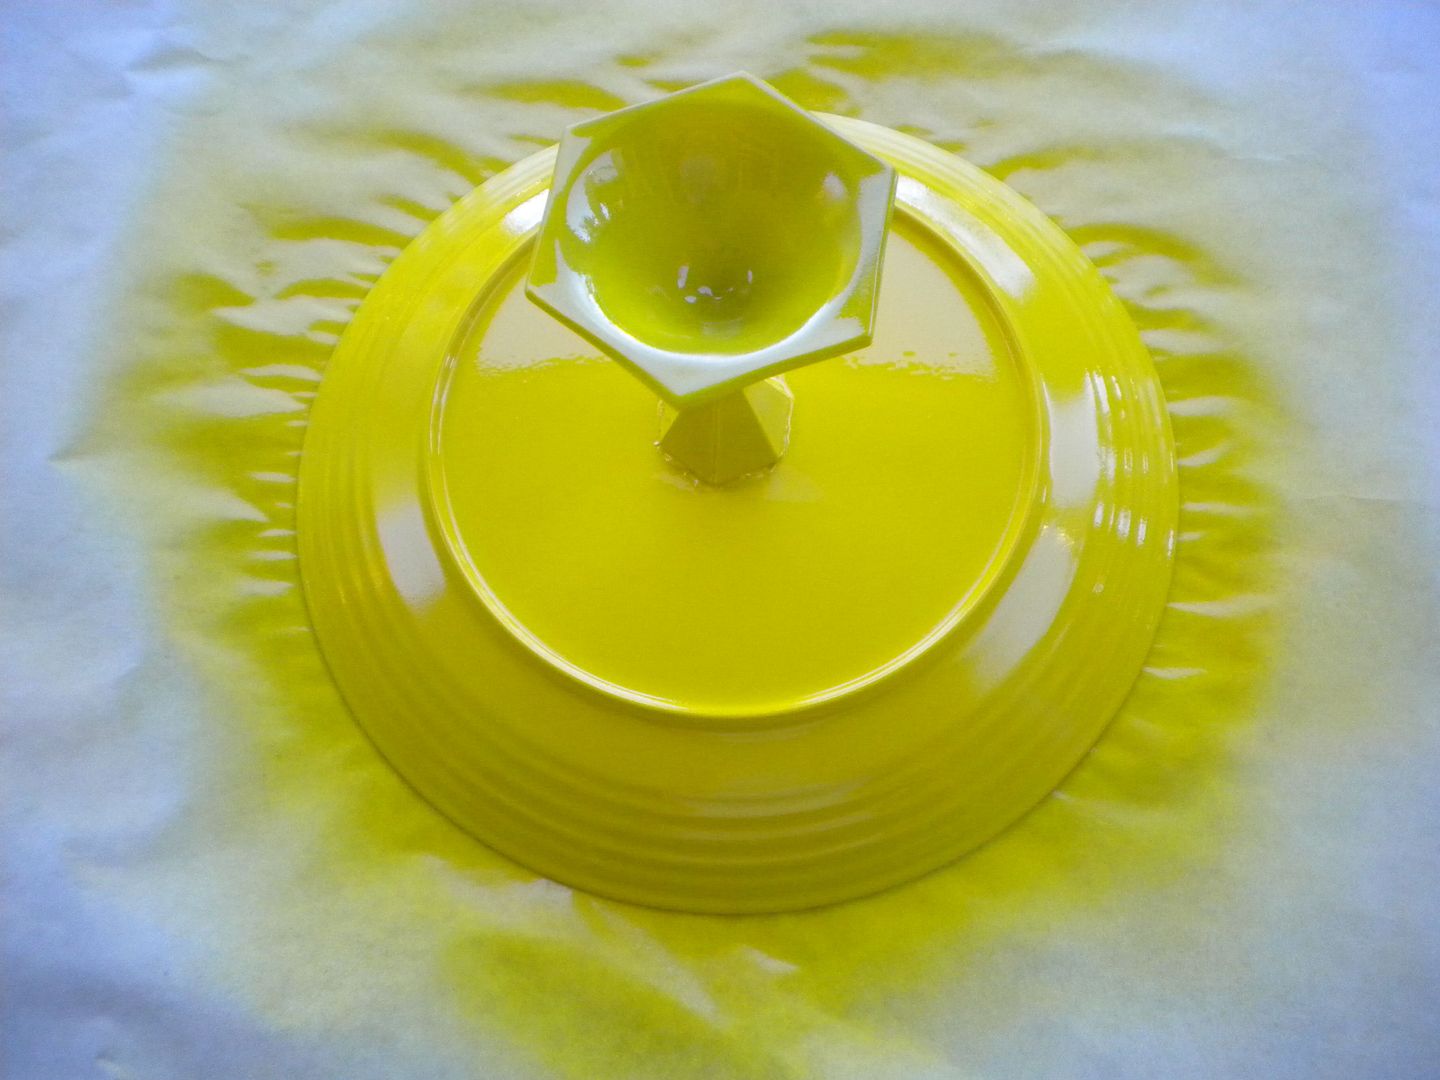 After the stand has dried, wash the top of the plate with dish soap and water. The stand is not dishwasher safe but is food friendly as long as food is not touching the painted surfaces. If you are worried about this then just place a doily or wax paper on top of the stand before putting food on it.
1 candle stick or goblet
Epoxy
1 heavy book
1 can of spray paint (I really like the way gloss looks for this project)
a sheet or paper to protect surfaces while painting
Making a home-made cake stand is incredibly easy. First, start of with a plate—any plate will work but I recommend using one that has the color or image you would like at the top of the stand as this will not be painted to keep the cake stand food friendly. Next, find a candle stick, goblet or really any sturdy object that is the height that you would like for your finished stand. I have used both candle sticks and goblets in the past.
Then take epoxy (use according to directions) and glue your candlestick or goblet to the bottom of the plate. DO NOT MOVE THE STAND.Place a heavy book on top of the stand and let the epoxy set according to directions. After the epoxy has set you should be able to pick up the stand with no movement from the candlestick or plateMake sure the plate is set firmly on a protected surface so that you can spray paint the outside of the cake stand. If there are edges of the paint off of the paper I would suggest covering the top of the plate with paper or painters tapeSpray the entire outer surface according to the directions on the spray paint can. Take your time on this step and stand back far enough to avoid drips. Also, this step make take a couple of layers of paint so plan to make the stands at least a day in advance of your party.After the stand has dried, wash the top of the plate with dish soap and water. The stand is not dishwasher safe but is food friendly as long as food is not touching the painted surfaces. If you are worried about this then just place a doily or wax paper on top of the stand before putting food on it.
Tutorial by: Jennie of A Well Crafted Party
Have you ever encountered a moment in where you just couldn't find the perfect cake or cupcake stand?! Well you don't have to look any further! Why not try this easy and affordable DIY Cake Stand Tutorial for your next party or event, created by Jennie of A Well Crafted Party especially for Eat • Drink • Pretty's site.
How to make your own Cake or Cupcake Stand Tutorial
Needed Materials:
1 plate
1 candle stick or goblet
Epoxy
1 heavy book
1 can of spray paint (I really like the way gloss looks for this project)
a sheet or paper to protect surfaces while painting
Making a home-made cake stand is incredibly easy. First, start of with a plate—any plate will work but I recommend using one that has the color or image you would like at the top of the stand as this will not be painted to keep the cake stand food friendly. Next, find a candle stick, goblet or really any sturdy object that is the height that you would like for your finished stand. I have used both candle sticks and goblets in the past.
Then take epoxy (use according to directions) and glue your candlestick or goblet to the bottom of the plate. DO NOT MOVE THE STAND.
Place a heavy book on top of the stand and let the epoxy set according to directions. After the epoxy has set you should be able to pick up the stand with no movement from the candlestick or plate
Make sure the plate is set firmly on a protected surface so that you can spray paint the outside of the cake stand. If there are edges of the paint off of the paper I would suggest covering the top of the plate with paper or painters tape
Spray the entire outer surface according to the directions on the spray paint can. Take your time on this step and stand back far enough to avoid drips. Also, this step make take a couple of layers of paint so plan to make the stands at least a day in advance of your party.
After the stand has dried, wash the top of the plate with dish soap and water. The stand is not dishwasher safe but is food friendly as long as food is not touching the painted surfaces. If you are worried about this then just place a doily or wax paper on top of the stand before putting food on it.
1 candle stick or goblet
Epoxy
1 heavy book
1 can of spray paint (I really like the way gloss looks for this project)
a sheet or paper to protect surfaces while painting
Making a home-made cake stand is incredibly easy. First, start of with a plate—any plate will work but I recommend using one that has the color or image you would like at the top of the stand as this will not be painted to keep the cake stand food friendly. Next, find a candle stick, goblet or really any sturdy object that is the height that you would like for your finished stand. I have used both candle sticks and goblets in the past.
Then take epoxy (use according to directions) and glue your candlestick or goblet to the bottom of the plate. DO NOT MOVE THE STAND.Place a heavy book on top of the stand and let the epoxy set according to directions. After the epoxy has set you should be able to pick up the stand with no movement from the candlestick or plateMake sure the plate is set firmly on a protected surface so that you can spray paint the outside of the cake stand. If there are edges of the paint off of the paper I would suggest covering the top of the plate with paper or painters tapeSpray the entire outer surface according to the directions on the spray paint can. Take your time on this step and stand back far enough to avoid drips. Also, this step make take a couple of layers of paint so plan to make the stands at least a day in advance of your party.After the stand has dried, wash the top of the plate with dish soap and water. The stand is not dishwasher safe but is food friendly as long as food is not touching the painted surfaces. If you are worried about this then just place a doily or wax paper on top of the stand before putting food on it.
Tutorial by: Jennie of A Well Crafted Party
Falling in love in the Fall season can be quite romantic. There are actually many fall weddings in the air this year! Therefore, today I wanted to do something different for Wedding Wednesdays. I will be be featuring several inspirational boards and photos of accessories to inspire the bride-to-be's that are finalizing the last bit of details for their beautiful upcoming weddings.

Mix and Match Fall Color Schemes:
Reds, Oranges, Browns, Greens, and Creame


~*~
Fall Cakes and Cupcakes


Falling in love in the Fall season can be quite romantic. There are actually many fall weddings in the air this year! Therefore, today I wanted to do something different for Wedding Wednesdays. I will be be featuring several inspirational boards and photos of accessories to inspire the bride-to-be's that are finalizing the last bit of details for their beautiful upcoming weddings.
Mix and Match Fall Color Schemes:
Reds, Oranges, Browns, Greens, and Creame
~*~
Fall Cakes and Cupcakes

Today I wanted to feature a cake that was absolutely eye candy when I stumbled upon it online!

This cake is called the Super Epic Rainbow Cake by Kaitlin Flannery (Whisk Kid),
who recently appeared on the Martha Stewart Show with the wonderful Ms. Martha herself!

Try out this delicious and fun recipe listed below for your next party or event!
Enjoy!
Cake Recipe: White Cake
(but not really because of the colors)
Ingredients:
2 sticks (226 g) butter, room temp
2 1/3 c (466 g) sugar
5 egg whites, room temp
2 teaspoons vanilla
3 c (375 g) flour
4 tsp baking powder
½ tsp salt
1 1/2 c (355 g) milk, warmed for 30 sec in microwave to bring to room temp
Red, orange, yellow, green, blue and purple GEL food coloring. Liquid will not be vibrant enough!
Directions:
Preheat the oven to 350F degrees. Oil and line how ever many 9” cake pans you have (I have three and I just reused them).
Sift together the flour, baking powder and salt. Set aside.
Cream the sugar and butter, then add the egg whites (I cracked them all into one bowl) and add them a little at a time. Add the vanilla and mix until fully incorporated. Then, alternating between wet and dry, add the milk and flour mixture in two parts.
Divide the batter amongst 6 bowls (I did it by weight. Weigh your mixing bowl before you begin adding ingredients and then subtract the weight of the bowl from the final measurement after the batter is completed. Divide that number by six and add that weight of batter to each bowl), and then whisk a fair amount of the appropriate food color into each bowl. Pour into the pans and bake for 15 minutes each.
When you remove them from the oven, let them rest on the cooling rack, in the pan, for ten minutes. Then flip, cover, and stash them in the fridge to cool quickly.
Frosting Recipe: Lemony Swiss Meringue Buttercream
*HUGE bowl needed to make alot of buttercream at one time! Please click here for a step-by-step guide to making Swiss Meringue Buttercream and troubleshooting tips!
Ingredients to fill and crumb coat:
9 egg whites
1 ¾ c (350 g) sugar
4 sticks (532 g) of butter, room temp
2 tsp lemon extract
Ingredients to frost:
5 egg whites
1 c (200 g) sugar
2 sticks (226 g) butter, room temp
1 tsp lemon extract
Directions:
Cook the egg whites and sugar in a small saucepan over medium heat, whisking constantly, until the sugar is completely dissolved (test by rubbing some between your fingers. If it's completely smooth, it's done). Pour into another bowl (a stand mixer is preferable) and whip on high speed until room temp. Then, on a medium-slow speed, add the butter, waiting until each piece is completely incorporated before adding the next. After all the butter has been added, turn the mixer back to high speed and whip until it has come together, about five minutes. Add the extract, beat briefly and then use.
If the buttercream seems soupy after all of the butter is added and does not come together after whipping, refrigerate for 5 to 7 minutes and continue whipping until it becomes fluffy and workable.
Recipe Source: Whisk Kid
Today I wanted to feature a cake that was absolutely eye candy when I stumbled upon it online!
This cake is called the Super Epic Rainbow Cake by Kaitlin Flannery (Whisk Kid),
who recently appeared on the Martha Stewart Show with the wonderful Ms. Martha herself!
Try out this delicious and fun recipe listed below for your next party or event!
Enjoy!
Cake Recipe: White Cake
(but not really because of the colors)
Ingredients:
2 sticks (226 g) butter, room temp
2 1/3 c (466 g) sugar
5 egg whites, room temp
2 teaspoons vanilla
3 c (375 g) flour
4 tsp baking powder
½ tsp salt
1 1/2 c (355 g) milk, warmed for 30 sec in microwave to bring to room temp
Red, orange, yellow, green, blue and purple GEL food coloring. Liquid will not be vibrant enough!
Directions:
Preheat the oven to 350F degrees. Oil and line how ever many 9” cake pans you have (I have three and I just reused them).
Sift together the flour, baking powder and salt. Set aside.
Cream the sugar and butter, then add the egg whites (I cracked them all into one bowl) and add them a little at a time. Add the vanilla and mix until fully incorporated. Then, alternating between wet and dry, add the milk and flour mixture in two parts.
Divide the batter amongst 6 bowls (I did it by weight. Weigh your mixing bowl before you begin adding ingredients and then subtract the weight of the bowl from the final measurement after the batter is completed. Divide that number by six and add that weight of batter to each bowl), and then whisk a fair amount of the appropriate food color into each bowl. Pour into the pans and bake for 15 minutes each.
When you remove them from the oven, let them rest on the cooling rack, in the pan, for ten minutes. Then flip, cover, and stash them in the fridge to cool quickly.
Frosting Recipe: Lemony Swiss Meringue Buttercream
*HUGE bowl needed to make alot of buttercream at one time! Please click here for a step-by-step guide to making Swiss Meringue Buttercream and troubleshooting tips!
Ingredients to fill and crumb coat:
9 egg whites
1 ¾ c (350 g) sugar
4 sticks (532 g) of butter, room temp
2 tsp lemon extract
Ingredients to frost:
5 egg whites
1 c (200 g) sugar
2 sticks (226 g) butter, room temp
1 tsp lemon extract
Directions:
Cook the egg whites and sugar in a small saucepan over medium heat, whisking constantly, until the sugar is completely dissolved (test by rubbing some between your fingers. If it's completely smooth, it's done). Pour into another bowl (a stand mixer is preferable) and whip on high speed until room temp. Then, on a medium-slow speed, add the butter, waiting until each piece is completely incorporated before adding the next. After all the butter has been added, turn the mixer back to high speed and whip until it has come together, about five minutes. Add the extract, beat briefly and then use.
If the buttercream seems soupy after all of the butter is added and does not come together after whipping, refrigerate for 5 to 7 minutes and continue whipping until it becomes fluffy and workable.
Recipe Source: Whisk Kid

Halloween's just around the corner and what better way to celebrate than to throw a party or decorate around the house!
Check out one of our more sophisticated and stylish collections this season,
Halloween Purple Damask Collection!
This collection is a "Do It Yourself" Printable Kit, that will nicely dress up any social gathering.
This printable kit is not only great for social gathering, but also for school events, work event, trick or treaters, candy stations, and much more! Decorate your chocolate and candy with cute matching labels. These files can be printed conveniently from your Inkjet printer or take them to your local print shops {i.e. Staples, Office Max, Fex Ex Office/Kinkos}. Each collection even comes with an invitation and DIY instructions for each project.

Our elegant
Halloween Purple Damask Collection
contains a color scheme of purple, green, black, and white.

~*~

• Fill-in square invitation*
• 2" circles for tags & cupcake toppers
• 2" circles for tags & cupcake toppers
{use a 2" scallop punch to easily cut these}
• Standard Hershey bar wrappers (1.55 oz)
• Bag tops for goody bags
• Standard Hershey bar wrappers (1.55 oz)
• Bag tops for goody bags
{create cute goody bags with zip lock bags!}
• Place cards for guest names or food/dessert table
• 8" x 10" "Happy Halloween" sign
• Place cards for guest names or food/dessert table
• 8" x 10" "Happy Halloween" sign
{easily place it in a festive frame}
• Hershey kiss mini circle stickers
• Hershey kiss mini circle stickers
{print on Inkjet sticker paper and use a 3/4 circle punch to easily cut these}
• Cylinder shaped treat box labels and instructions
• Cylinder shaped treat box labels and instructions
{Instructions are as featured on Martha Stewarts Halloween Handbook!}
9. 8.5 x 11 Halloween Purple Damask Patterned Sheet
9. 8.5 x 11 Halloween Purple Damask Patterned Sheet

With all this and a few props around the house you can create everything you see below...


{Halloween pudding recipe coming to our site next week!}


If your are looking for something rather a little more fun, then check out our
~*~
Don't forget to visit our Etsy Shop to view our other party accessories!
Halloween's just around the corner and what better way to celebrate than to throw a party or decorate around the house!
Check out one of our more sophisticated and stylish collections this season,
Halloween Purple Damask Collection!
This collection is a "Do It Yourself" Printable Kit, that will nicely dress up any social gathering.
This printable kit is not only great for social gathering, but also for school events, work event, trick or treaters, candy stations, and much more! Decorate your chocolate and candy with cute matching labels. These files can be printed conveniently from your Inkjet printer or take them to your local print shops {i.e. Staples, Office Max, Fex Ex Office/Kinkos}. Each collection even comes with an invitation and DIY instructions for each project.
Our elegant
Halloween Purple Damask Collection
contains a color scheme of purple, green, black, and white.
~*~
• Fill-in square invitation*
• 2" circles for tags & cupcake toppers
• 2" circles for tags & cupcake toppers
{use a 2" scallop punch to easily cut these}
• Standard Hershey bar wrappers (1.55 oz)
• Bag tops for goody bags
• Standard Hershey bar wrappers (1.55 oz)
• Bag tops for goody bags
{create cute goody bags with zip lock bags!}
• Place cards for guest names or food/dessert table
• 8" x 10" "Happy Halloween" sign
• Place cards for guest names or food/dessert table
• 8" x 10" "Happy Halloween" sign
{easily place it in a festive frame}
• Hershey kiss mini circle stickers
• Hershey kiss mini circle stickers
{print on Inkjet sticker paper and use a 3/4 circle punch to easily cut these}
• Cylinder shaped treat box labels and instructions
• Cylinder shaped treat box labels and instructions
{Instructions are as featured on Martha Stewarts Halloween Handbook!}
9. 8.5 x 11 Halloween Purple Damask Patterned Sheet
9. 8.5 x 11 Halloween Purple Damask Patterned Sheet
With all this and a few props around the house you can create everything you see below...
{Halloween pudding recipe coming to our site next week!}
If your are looking for something rather a little more fun, then check out our
~*~
Don't forget to visit our Etsy Shop to view our other party accessories!

Kroma Design Studio Parties & Events would like to introduce an easy and affordable solution to celebrating this year's Holloween with fun and creative "Do It Yourself" Printable Kits, that your family and friends will surely love!
These printable kits are not only great for parties but also for school events, work gatherings, trick or treaters, candy stations, and much more! Decorate your chocolate and candy with cute matching labels. These files can be printed conveniently from your Inkjet printer or take them to your local print shops {i.e. Staples, Office Max, Fex Ex Office/Kinkos}. Each collection even comes with an invitation and DIY instructions for each project.

Check out one of our themes this year called the
Halloween Polka Dots Collection,
that contains a color scheme of orange, green, black, and white.


~*~

• Fill-in square invitation*
• 2" circles for tags & cupcake toppers
• 2" circles for tags & cupcake toppers
{use a 2" scallop punch to easily cut these}
• Standard Hershey bar wrappers (1.55 oz)
• Bag tops for goody bags
• Standard Hershey bar wrappers (1.55 oz)
• Bag tops for goody bags
{create cute goody bags with zip lock bags!}
• Place cards for guest names or food/dessert table
• 8" x 10" "Happy Halloween" sign
• Place cards for guest names or food/dessert table
• 8" x 10" "Happy Halloween" sign
{easily place it in a festive frame}
• Hershey kiss mini circle stickers
• Hershey kiss mini circle stickers
{print on Inkjet sticker paper and use a 3/4 circle punch to easily cut these}
• Cylinder shaped treat box labels and instructions
• Cylinder shaped treat box labels and instructions
{Instructions are as featured on Martha Stewarts Halloween Handbook!}
9. 8.5 x 11 Halloween Polka Dots Patterned Sheet
9. 8.5 x 11 Halloween Polka Dots Patterned Sheet
With all this and a few props around the house you can create everything you see below...


Halloween Buckets may be found at your local Target stores.
If your are looking for something rather a little more sophisticated & stylish,
~*~
Don't forget to visit our Etsy Shop to view our other party accessories!
Kroma Design Studio Parties & Events would like to introduce an easy and affordable solution to celebrating this year's Holloween with fun and creative "Do It Yourself" Printable Kits, that your family and friends will surely love!
These printable kits are not only great for parties but also for school events, work gatherings, trick or treaters, candy stations, and much more! Decorate your chocolate and candy with cute matching labels. These files can be printed conveniently from your Inkjet printer or take them to your local print shops {i.e. Staples, Office Max, Fex Ex Office/Kinkos}. Each collection even comes with an invitation and DIY instructions for each project.
Check out one of our themes this year called the
Halloween Polka Dots Collection,
that contains a color scheme of orange, green, black, and white.
~*~
• Fill-in square invitation*
• 2" circles for tags & cupcake toppers
• 2" circles for tags & cupcake toppers
{use a 2" scallop punch to easily cut these}
• Standard Hershey bar wrappers (1.55 oz)
• Bag tops for goody bags
• Standard Hershey bar wrappers (1.55 oz)
• Bag tops for goody bags
{create cute goody bags with zip lock bags!}
• Place cards for guest names or food/dessert table
• 8" x 10" "Happy Halloween" sign
• Place cards for guest names or food/dessert table
• 8" x 10" "Happy Halloween" sign
{easily place it in a festive frame}
• Hershey kiss mini circle stickers
• Hershey kiss mini circle stickers
{print on Inkjet sticker paper and use a 3/4 circle punch to easily cut these}
• Cylinder shaped treat box labels and instructions
• Cylinder shaped treat box labels and instructions
{Instructions are as featured on Martha Stewarts Halloween Handbook!}
9. 8.5 x 11 Halloween Polka Dots Patterned Sheet
9. 8.5 x 11 Halloween Polka Dots Patterned Sheet
With all this and a few props around the house you can create everything you see below...
Halloween Buckets may be found at your local Target stores.
If your are looking for something rather a little more sophisticated & stylish,
~*~
Don't forget to visit our Etsy Shop to view our other party accessories!

This Fire Engine Party came out absolutely adorable that I just had to share these details!
Luca's mom contacted me awhile ago to work with her on designing accessories
{tags, food place cards, hershey kiss stickers, hershey miniature labels,
and personalized thank you cards}
that matched her Fire Engine Themed Invites purchased from Tiny Prints.
Her creativity and talent shined especially in this beautiful dessert table and details featured below...


Thanks for sharing this Ida!
Everything turned out so beautiful for Luca's Birthday!
~*~
Have a special party in mind for your little one or someone special?
Contact us and we can help you design DIY printable accessories
for your next event, visit our Etsy shop for some of our featured party accessories.
~*~
Have a special party in mind for your little one or someone special?
Contact us and we can help you design DIY printable accessories
for your next event, visit our Etsy shop for some of our featured party accessories.
This Fire Engine Party came out absolutely adorable that I just had to share these details!
Luca's mom contacted me awhile ago to work with her on designing accessories
{tags, food place cards, hershey kiss stickers, hershey miniature labels,
and personalized thank you cards}
that matched her Fire Engine Themed Invites purchased from Tiny Prints.
Her creativity and talent shined especially in this beautiful dessert table and details featured below...
Thanks for sharing this Ida!
Everything turned out so beautiful for Luca's Birthday!
~*~
Have a special party in mind for your little one or someone special?
Contact us and we can help you design DIY printable accessories
for your next event, visit our Etsy shop for some of our featured party accessories.
~*~
Have a special party in mind for your little one or someone special?
Contact us and we can help you design DIY printable accessories
for your next event, visit our Etsy shop for some of our featured party accessories.
Subscribe to:
Posts (Atom)


